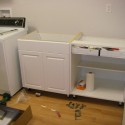
In the laundry room, I used some ready-to-assemble cabinets from Home Depot, and some off-the-shelf laminate counter top from Rona that I had them cut at the store.
The sink came with a template, so I traced that onto the countertop with a sharpie, use a hole saw on the edge to start it off, and then cut out the shape with a jigsaw.
Almost constantly, the box stores have different promotions going on (eg, I bought the cabinets during a 10% off all kitchen cabinets sale), and I’ve tried to take advantage of these as much as I can.
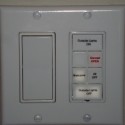 I’ve started putting a bunch of Insteon stuff around my house, and one of the things I did is link the garage door to a KeypadLinc.
I found a way to set it up using a single button, which I’m posting here mostly for myself in case I ever need to do it again, but maybe it will help something else. A side note: there are many easy-to-find ways to do this with multiple buttons, and I’m sure someone else has figured out my single button way before me and posted on page 46 of some obscure forum thread, but I hate reading those threads (and generally don’t) and you probably do too.
I’ve started putting a bunch of Insteon stuff around my house, and one of the things I did is link the garage door to a KeypadLinc.
I found a way to set it up using a single button, which I’m posting here mostly for myself in case I ever need to do it again, but maybe it will help something else. A side note: there are many easy-to-find ways to do this with multiple buttons, and I’m sure someone else has figured out my single button way before me and posted on page 46 of some obscure forum thread, but I hate reading those threads (and generally don’t) and you probably do too.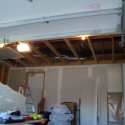 With the warm weather, I finally started a multi-faceted project that required tearing apart the garage ceiling. My original plan was to get network/cable wiring into the remaining two bedrooms, and install a central vacuum system. Late last year when I opened an exploratory hole in the garage ceiling drywall, I found the ceiling is built down about 18″ and insulated with batt insulation, so I decided I’d also improve the insulation and raise it up.
 In my last post, I finished the upstairs electrical work, so next I could put up new vapour barrier. Since the old stuff is kraft paper-faced insulation, I really don’t think it’s a great vapour barrier as it’s not even sealed well. I put in new 6mil barrier, and used acoustic caulk to seal it around the edges. At least in the part I’ve opened up I have not introduced any new leaks.
 One thing that has always been awkward about our house is the front entrance. It is about 7′ long by 3.5′ wide with a wall that means even two people trying to get coats/shoes on are in each other’s way. My plan is to knock the wall down and put a half-wall about 3.5′ over to act as a separator but keep the space open.
Nearly 4 years ago (yikes), I tore out the carpet in the entrance, but then we couldn’t really decide exactly what to do, other projects got in the way, and so for the last 4 years we’ve lived with just a runner on top of the subfloor and no closet doors.
One thing that has always been awkward about our house is the front entrance. It is about 7′ long by 3.5′ wide with a wall that means even two people trying to get coats/shoes on are in each other’s way. My plan is to knock the wall down and put a half-wall about 3.5′ over to act as a separator but keep the space open.
Nearly 4 years ago (yikes), I tore out the carpet in the entrance, but then we couldn’t really decide exactly what to do, other projects got in the way, and so for the last 4 years we’ve lived with just a runner on top of the subfloor and no closet doors.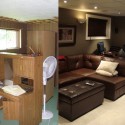 My fiance and I moved into our first house in August 2008. The house was built in 1974, and we bought it from the original owners, so everything was in fairly decent shape. The basement was partially finished, with cement floors, wood paneling, and the old upstairs kitchen cabinets (a reno they did at some point) hung everywhere. The wood paneled half of the basement was insulated, but the laundry room side was not.
 So of course it’s been a long time since I posted, but I figured I’d finally put up the pictures of the completed basement. Even these are now a few months old, but all that’s really changed is my desk isn’t quite as neat. All in all, it’s worked out great, and we spend a good deal of time here. With just the two of us living here, it’s very functional as an office / TV room.
 So as usual I’m a bit behind blogging, but a couple weeks ago I finally had the carpet installed. This is pretty much the end of the construction phase.
The carpet was one of the few things I was wise enough not to do myself, so I don’t have a ton of pictures of the progress (also I was on a conference call most of the morning while it was being put in).
So as usual I’m a bit behind blogging, but a couple weeks ago I finally had the carpet installed. This is pretty much the end of the construction phase.
The carpet was one of the few things I was wise enough not to do myself, so I don’t have a ton of pictures of the progress (also I was on a conference call most of the morning while it was being put in).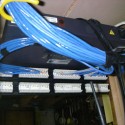 I finished up all the jacks for the media wiring – the cables for which I ran back in March (see Media Wiring, Part 1.
I also finished terminating the network cables for the basement (10 drops). Since I was rushing to get them in before the insulation was done, I didn’t actually label any of the wires. Luckily, I have a wire tracer, which is an extremely handy tool for these sorts of situations.
I finished up all the jacks for the media wiring – the cables for which I ran back in March (see Media Wiring, Part 1.
I also finished terminating the network cables for the basement (10 drops). Since I was rushing to get them in before the insulation was done, I didn’t actually label any of the wires. Luckily, I have a wire tracer, which is an extremely handy tool for these sorts of situations. Back to something I hate doing: trim.
I spent some time trying to decide how to finish the fridge cubby hole, then ended up using some stop molding for the edges (the baseboard I had was too thick, and too large for a tiny space you shouldn’t really notice), and some corner guard for the end. I sanded it down so the edges extend out a bit and are rounded down.
Back to something I hate doing: trim.
I spent some time trying to decide how to finish the fridge cubby hole, then ended up using some stop molding for the edges (the baseboard I had was too thick, and too large for a tiny space you shouldn’t really notice), and some corner guard for the end. I sanded it down so the edges extend out a bit and are rounded down.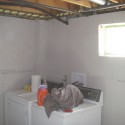 Once again, I am quite far behind in blogging my progress, so I’ll try to create some posts to catch up. For this one, I figured it would make more sense to show it through several stages over time, to explain why things were done the way they were.
In the corner of the laundry room, I have a bulkhead that runs a 4″ dryer vent up and outside. I also have an air conditioning line that runs outside, and happens to drop down lower than my ceiling will be.
Once again, I am quite far behind in blogging my progress, so I’ll try to create some posts to catch up. For this one, I figured it would make more sense to show it through several stages over time, to explain why things were done the way they were.
In the corner of the laundry room, I have a bulkhead that runs a 4″ dryer vent up and outside. I also have an air conditioning line that runs outside, and happens to drop down lower than my ceiling will be.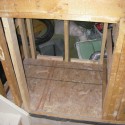 As I mentioned yesterday, there is another door which is access to a little room built for cat litter. This basically came about because we were trying to figure out where to store the cat litter (right now it’s in the kitchen, which is terrible). The laundry room is an obvious choice, but it’s not really that big, so having cat litter would be a bit inconvenient there. My girlfriend also wants to be able to hang black clothes in there to dry without them getting white cat hair all over them (eg, shut the door).
 I’ve been busy getting all the doors painted, hung, and finished. There are two almost regular size doors: one for the bathroom, and one for the laundry room. There is also a bi-fold closet door in both the bathroom (leading to electrical panel, central vac and under-stairs storage) and another in the laundry room going into the furnace and hot water tank area. There’s also a couple smaller doors that I had to cut down.
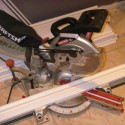 Lately, I’ve spent a lot of boring time painting (though Jocelyn has helped me a lot with painting), cutting, installing, and wood filling trim (and still have some more to go). I’ve been coming to the conclusion that I am not a fan of finishing work.
I’ve been borrowing Jocelyn’s dad’s mitre saw almost since I started this project, but I’ve used it so much that I decided it was time to buy my own.
Lately, I’ve spent a lot of boring time painting (though Jocelyn has helped me a lot with painting), cutting, installing, and wood filling trim (and still have some more to go). I’ve been coming to the conclusion that I am not a fan of finishing work.
I’ve been borrowing Jocelyn’s dad’s mitre saw almost since I started this project, but I’ve used it so much that I decided it was time to buy my own.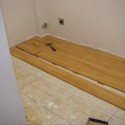 I put laminate flooring in the laundry and bathrooms, because it’s relatively inexpensive and easy to maintain. Though I’ve never installed it before, it’s pretty straight-forward (and as such, I didn’t take very many pictures, I’m realizing now).
I put a basic foam underlay in first. Even though this is a basement, I already have a sub-floor that acts as a vapour/moisture-barrier, so I didn’t need the fancier (and more expensive) underlay that also does those jobs.
I put laminate flooring in the laundry and bathrooms, because it’s relatively inexpensive and easy to maintain. Though I’ve never installed it before, it’s pretty straight-forward (and as such, I didn’t take very many pictures, I’m realizing now).
I put a basic foam underlay in first. Even though this is a basement, I already have a sub-floor that acts as a vapour/moisture-barrier, so I didn’t need the fancier (and more expensive) underlay that also does those jobs.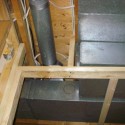 I used circular vents for the ceilings, simply because I thought they were nicer looking than the square floor-style vents mounted upside down. There are two 5″ vents in the main room, one 5″ vent in the laundry room, and a smaller 3″ vent in the bathroom. For all but the bathroom, I just used the previously existing vent lines, but cut them shorter and used 5″ flexible duct to connect them to the vent in the ceiling tiles.
 Continuing to move along, with painting complete, suspended ceiling finished, and lights installed. Still need to make a couple touchups on paint in some spots where the tape pulled it off, and a couple dings I made moving things around. It’s hard to tell from the pictures, the main area is painted dark grayish-brown (though it took Joce a good week or two to acknowledge it even had brown in it, to me that was the first color I saw.
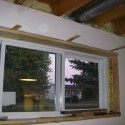 Now that the drywall is finished, I installed the window sills. I’m just using 1×8 pine board, trimmed to size on a table saw. I’ll later add trim around the outside. I ended up deciding that it was worth finally buying a brad nailer (and hey, I needed a compressor anyways) – definitely ranks up there among my most fun-to-use tools. It made quick work of putting the sills in place.
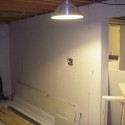 Okay, so I’ve been a bit lazy with the blog lately. Things have only been happening in the last few weeks though, but I’ll make posts to work through it all. I finished putting the rest of the drywall up (which I started in April, wow..). Nothing special, a bunch of cutting and screwing involved..
After this, I started taping, with the help of my Dad. Now, this is where the big delay comes in, and why not a lot was accomplished since April.
Okay, so I’ve been a bit lazy with the blog lately. Things have only been happening in the last few weeks though, but I’ll make posts to work through it all. I finished putting the rest of the drywall up (which I started in April, wow..). Nothing special, a bunch of cutting and screwing involved..
After this, I started taping, with the help of my Dad. Now, this is where the big delay comes in, and why not a lot was accomplished since April.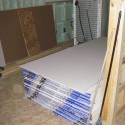 With the help of my friend Matt, I finally started getting the drywall up. It’s a nice change, things are actually starting to look like real rooms now, instead of just framing, wood and wires everywhere.
I haven’t done a lot of drywall (a couple of wall sections, and more recently the headers for the upstairs closets), but I think we did pretty well. There were some complicated cuts to do.
With the help of my friend Matt, I finally started getting the drywall up. It’s a nice change, things are actually starting to look like real rooms now, instead of just framing, wood and wires everywhere.
I haven’t done a lot of drywall (a couple of wall sections, and more recently the headers for the upstairs closets), but I think we did pretty well. There were some complicated cuts to do.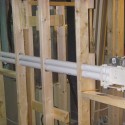 It’s been a while since I posted, partly because I haven’t gotten a lot done in the last few weeks until just recently. I did get all the media wiring installed, however.
I’ll be mounting an LCD TV to the wall, and so I put in a recessed media box to hold all the cables. There’s also a 110v plug inside this box.
I really like the idea behind this (as opposed to putting keystone jacks behind the TV) since it means one less connection for all the wires, the excess wires tuck inside the box, and it’s easy to add to later.
It’s been a while since I posted, partly because I haven’t gotten a lot done in the last few weeks until just recently. I did get all the media wiring installed, however.
I’ll be mounting an LCD TV to the wall, and so I put in a recessed media box to hold all the cables. There’s also a 110v plug inside this box.
I really like the idea behind this (as opposed to putting keystone jacks behind the TV) since it means one less connection for all the wires, the excess wires tuck inside the box, and it’s easy to add to later.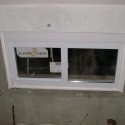 I took advantage of some nice weather a couple weeks ago to finally replace the back (laundry room) window. I replaced the front windows a couple of months ago. The back window was 40″ x 24″, and had a slider on the outside, with a hinged flip-up window on the inside.
One issue I had was that the top of the window was actually above the gas and water lines, so once I added a ceiling to the laundry room, the window would have been above it.
I took advantage of some nice weather a couple weeks ago to finally replace the back (laundry room) window. I replaced the front windows a couple of months ago. The back window was 40″ x 24″, and had a slider on the outside, with a hinged flip-up window on the inside.
One issue I had was that the top of the window was actually above the gas and water lines, so once I added a ceiling to the laundry room, the window would have been above it.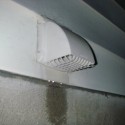 While I was getting ready for the insulation, I disconnected the dryer and noticed basically a very cold wind coming out of the end of the pipe. Upon closer inspection, there was actually frost on the pipe inside of the house, and when I took it apart, there was actual snow in the outside vent (the picture is hard to make out, but most of that is snow, except for at the very end, which is just dryer lint).
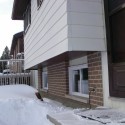 The insulation was finally done, and it couldn’t have been soon enough. It’s amazing how expensive it is to heat a house with no insulation in the basement..
As I’ve mentioned before, I’m using a spray-in foam insulation (HeatLok, though I wasn’t looking for a particular brand when finding a contractor to do it, it’s just the one mine – Frontenac Foam Insulation – used). There are some great benefits to this stuff:
The insulation was finally done, and it couldn’t have been soon enough. It’s amazing how expensive it is to heat a house with no insulation in the basement..
As I’ve mentioned before, I’m using a spray-in foam insulation (HeatLok, though I wasn’t looking for a particular brand when finding a contractor to do it, it’s just the one mine – Frontenac Foam Insulation – used). There are some great benefits to this stuff: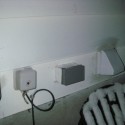 I have most of the wiring run, concentrating on the outside walls since it needs to be done before insulation. The laundry room has its own circuit (GFCI-protected), and there is also a light in the furnace room/closet. There are 8 plugs in the rec-room area (since I’ll be using it as my office space, I wanted lots of plugs), on two separate circuits. There is also another separate circuit for all the lights.
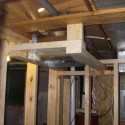 Since there is no window in the basement bathroom, I’m adding an exhaust vent to it. I’m using a 90 CFM fan which is rated at 0.5 somes (which is almost silent) – although I’m putting it through 3″ duct instead of 4″, which I believe drops the rating to 80 CFM (still more than enough) and makes it slightly louder.
Of course the exhaust air needs a place to go, so that meant adding a new vent.
Since there is no window in the basement bathroom, I’m adding an exhaust vent to it. I’m using a 90 CFM fan which is rated at 0.5 somes (which is almost silent) – although I’m putting it through 3″ duct instead of 4″, which I believe drops the rating to 80 CFM (still more than enough) and makes it slightly louder.
Of course the exhaust air needs a place to go, so that meant adding a new vent.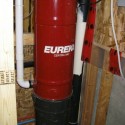 I’ve been getting behind with my blogging, so I’m going to try and post a few entries to catch up to where I actually am with the renovations process. I didn’t get too much done over the holidays, but I am still making decent progress. It’s a bit sad to think that I could probably do what I’ve done in two or three weeks working full-time, but such is life, and having a full-time job that allows me to pay for all of this.
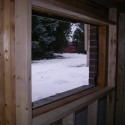 One of the reasons we bought this house (as opposed to some of the other similar places in the area) was because most of the windows had been replaced within the last few years. There are 4 windows that haven’t been replaced: 3 in the basement, and one in the upstairs bathroom.
The old windows were fairly typical of 1970’s construction, by which I mean, pretty horrible. Basically they’re just two panes of glass that slide up against each other, and two layers of these so there is an air space in between.
One of the reasons we bought this house (as opposed to some of the other similar places in the area) was because most of the windows had been replaced within the last few years. There are 4 windows that haven’t been replaced: 3 in the basement, and one in the upstairs bathroom.
The old windows were fairly typical of 1970’s construction, by which I mean, pretty horrible. Basically they’re just two panes of glass that slide up against each other, and two layers of these so there is an air space in between.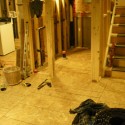 To do the basement sub-floor, I’m using a product called Delta-FL, which I picked up at Rona. It’s basically a big roll of dimpled plastic, which sits on top of the basement slab and acts as a vapour barrier, adds an air gap that helps insulate the floor, and also raises the floor up off the ground to avoid water damage in case there is a tiny amount of water.
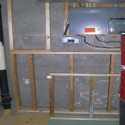 The house was built in 1974, so there are two implications as far as electrical goes: there is aluminum wiring, and there is a fuse box.
Not too much I can do about the aluminum, and in fact, so long as it’s done properly, aluminum is quite safe. It’s still often used for service entrance wiring (eg, from the pole to your panel), and it’s still used extensively throughout the electricity distribution system.
The house was built in 1974, so there are two implications as far as electrical goes: there is aluminum wiring, and there is a fuse box.
Not too much I can do about the aluminum, and in fact, so long as it’s done properly, aluminum is quite safe. It’s still often used for service entrance wiring (eg, from the pole to your panel), and it’s still used extensively throughout the electricity distribution system.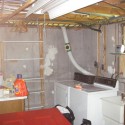 I’m going to be putting in closed-cell spray foam insulation. The big advantage here is the minimal space required – 3″ is over R-20, and it can fit in a 2×4 framed wall.
To start with , here’s a couple shots of what I ripped out.
Half of the basement had some old insulation that had an R-value of maybe R-7. It also had an integrated paper vapour barrier, which is not very effective.
I’m going to be putting in closed-cell spray foam insulation. The big advantage here is the minimal space required – 3″ is over R-20, and it can fit in a 2×4 framed wall.
To start with , here’s a couple shots of what I ripped out.
Half of the basement had some old insulation that had an R-value of maybe R-7. It also had an integrated paper vapour barrier, which is not very effective. A relatively simple thing we did was replace the kitchen faucet. The kitchen was renovated fairly recently (within the last 10 years), so there is not a lot we were planning on doing with it. The old faucet was leaking from the handle a bit when turned on, and a bit ugly. It was also a bit short for the sink, making it hard to fill up pots etc sometimes.
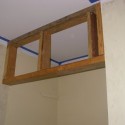 I haven’t been posting updates very regularly, but I have been quite busy working on my house.
One of the non-basement projects I’ve (half) completed is the front hall closet. For some reason, I didn’t take a before photo, but basically it had a bi-fold door that went all the way to the ceiling, 8′ high, with no header. It also didn’t open very smoothly, which I later figured out was because it was mounted to an old floor underneath the carpet, so it didn’t really have room for the carpet at the bottom.
I haven’t been posting updates very regularly, but I have been quite busy working on my house.
One of the non-basement projects I’ve (half) completed is the front hall closet. For some reason, I didn’t take a before photo, but basically it had a bi-fold door that went all the way to the ceiling, 8′ high, with no header. It also didn’t open very smoothly, which I later figured out was because it was mounted to an old floor underneath the carpet, so it didn’t really have room for the carpet at the bottom.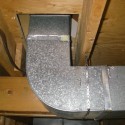 The main heating duct for the house entered the crawlspace by running down the side of the wall directly in front of the stairs. This meant there was a large protrusion into the room in front of the stairs, which just kind of annoyed me because it just seemed in the way, and contributed a bit to the basement feeling smaller. It also annoyed me because it looked to me like it would be easy to run the duct underneath a space in the stairs directly ahead of where it currently ran down the wall — which is exactly what I did.
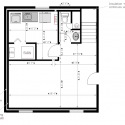 I’ve spent the last few days (well, longer than that, really) pondering what the exact layout will be for the basement. So here is what it was when I first bought the house:
You can see some pictures of it in this post
The old kitchen cabinets, including the old sink, was moved into the laundry room at some point, in addition to the laundry sink already there. Behind the cabinet, a few inches away from the wall, is the main waste water pipe for the house.
I’ve spent the last few days (well, longer than that, really) pondering what the exact layout will be for the basement. So here is what it was when I first bought the house:
You can see some pictures of it in this post
The old kitchen cabinets, including the old sink, was moved into the laundry room at some point, in addition to the laundry sink already there. Behind the cabinet, a few inches away from the wall, is the main waste water pipe for the house.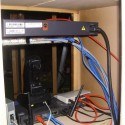 After running network cables the next step, of course, is to terminate them.
Using one of the old cabinets that happened to be close to the right size, I built a rudimentary 19″ rack. It’s not too bad for a DIY rack, especially considering a small swing-out metal rack costs around $250.
I basically took an old cabinet, cut the middle shelf out and turned the whole thing on its side.
After running network cables the next step, of course, is to terminate them.
Using one of the old cabinets that happened to be close to the right size, I built a rudimentary 19″ rack. It’s not too bad for a DIY rack, especially considering a small swing-out metal rack costs around $250.
I basically took an old cabinet, cut the middle shelf out and turned the whole thing on its side. With the basement torn out, and access to all of the main floor, I started running wiring for network and video. I’m running two network cables and one cable to each of the bedrooms, two spots in the family room, and one spot in the dining room.
Since the upstairs is finished, I wanted to disrupt it the least amount possible, so I purchased a 54″ flexible installer’s drill bit. It’s 9⁄16″ which is big enough for all the cables I’m running.
With the basement torn out, and access to all of the main floor, I started running wiring for network and video. I’m running two network cables and one cable to each of the bedrooms, two spots in the family room, and one spot in the dining room.
Since the upstairs is finished, I wanted to disrupt it the least amount possible, so I purchased a 54″ flexible installer’s drill bit. It’s 9⁄16″ which is big enough for all the cables I’m running. My girlfriend and I just bought a house. It’s a bit older – 32 years old, to be exact – and it shows, in a few places. My first big project is to renovate the basement and turn it into an office / rec-room area, and a laundry room. I figured it would be interesting to some people if I blogged, plus it is some extra motivation for me to get it done in a timely basis.